Archives for category: DIY

hutch restained

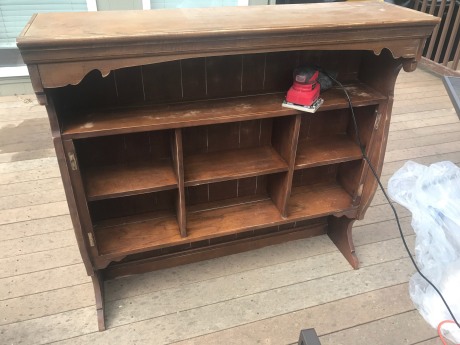
So I bought a two-piece hutch on Craigslist for $50 including the seller delivering it to our house. I knew it needed some work on the drawers (the seller had tried to repair lots of the inside parts). I also soon realized that it came from a smoker’s den (ha!) when cigarette butts literally fell out of it.

I took all the drawers out and aired everything outside for a few days. I also wiped it down many times with vinegar. When I brought it inside I placed big bowls of baking soda in the drawers and cabinets to try to suck up some of the smoke smell.

hutch door

hutch before

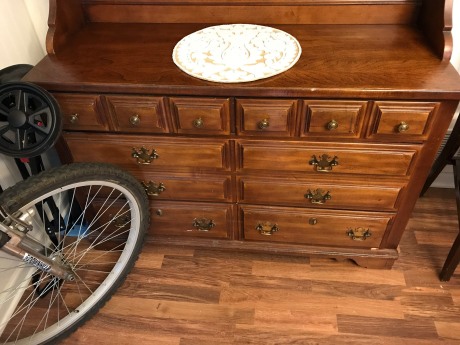
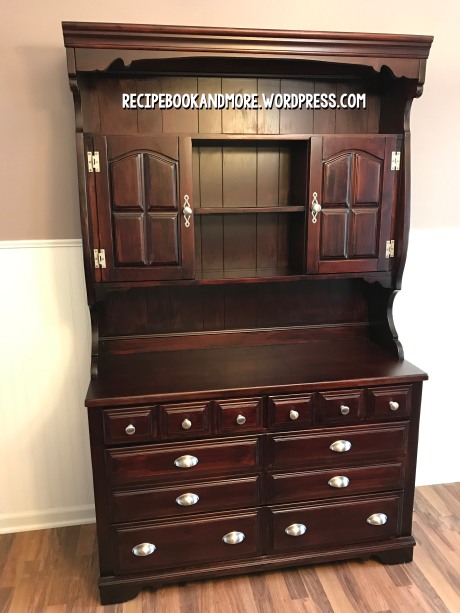
My dad fixed all of the drawers (thanks, Dad!!!) and we had a functional, albeit dated-looking dining room hutch. Think 1980s antique brass handles and knobs and a light finish with dark speckles. And an occasional smokey scent when it got humid or warm…

Fast forward to a couple years later; I bought some wooden dining room chairs and 20 yes TWENTY soup bowls yikes from a closed restaurant auction (here’s my post on spiffing up the soup bowls). The chairs are a darker wood, and it was like those “If You Give a Mouse a Cookie” books – now that I had dark chairs I wanted a darker hutch. And a darker hutch needed updated knobs and drawer pulls. And a nice hutch and chairs called for a matching plant stand/table and then I wanted a new tablecloth, etc, etc, etc.

Anyway, here’s what I did to update the hutch. I took out the drawers and removed the doors and hardware. I wanted to get the top layer off and not go all the way to the wood, so I sanded all the surfaces with 220-grit sandpaper (I used a 1/4-sheet electric sander for the large surfaces, and sanded the smaller details by hand). I wiped everything with a damp rag to get all of the dust.

hutch sanding

I applied one coat of Minwax PolyShades Bombay Mahogany (Satin) and let it dry overnight. Then I lightly buffed over the stain with Extra Fine #000 Steel Wool and wiped it down before adding a second coat of PolyShades.

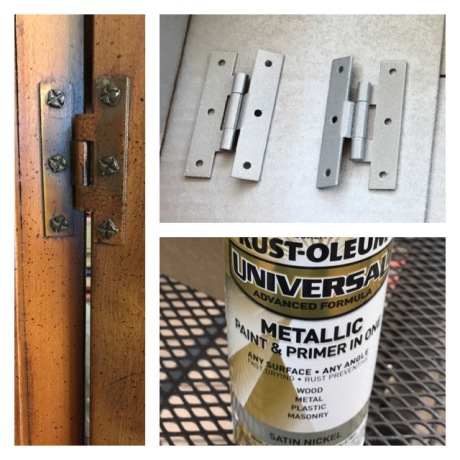
After the second coat dried my favorite step was next: adding new knobs and drawer pulls. I decided on satin nickel, and used Liberty 2-1/2″ drawer pulls and Liberty 1-1/4″ round knobs. I put satin nickel backplates behind the knobs on the two doors.

I scoured the internet and local home improvement stores for replacement hinges, but they are some weird style that’s impossible to find. I didn’t want to fill in holes and drill new ones, so I ended up spray painting the original hinges and screws with Rust-Oleum Satin Nickel Metallic Spray Paint.

hutch hinge

The smoke smell is definitely gone for now (hurray for varnish fumes, ha!) and I am very happy with how all the different pieces our little Frankenstein hutch came together. Who’s ready to eat some soup?!?

hutch restained


Here’s an easy way to remove scratches from dishes and make them shine like new.

Life Hacks - how to remove those little black scratches from your dishes - So easy and they look brand new

One of my favorite West Omaha restaurants closed recently (*sniffle*) and they auctioned off everything that was inside. I ended up with a lot (get it, a “lot”?!?) of wide rimmed soup bowls. Twenty of them, eek! I paid just $0.75 each and figure we can have all of our friends over for a soup party, soooo wild and crazy, right?!? Ha.

Anyway, these were obviously used for tons of restaurant customers, and were pretty scratched up (and literally black on the underside rim). Enter my secret weapon: BAR KEEPERS FRIEND.

I first tried this magical powder when we snaked out a toilet (um, gross!) and the metal snake left scratches in the porcelain bowl. I sprinkled some Bar Keepers Friend on the water, let it sit for a few hours, and when I scrubbed the bowl then flushed, the scratches were gone. It was awesome.

I bought a new container at Target for $1.99, but you can find Bar Keepers Friend almost anywhere that sells cleaning supplies. Bar Keepers Friend also comes in a liquid form, and a spray bottle with foam, but I stuck to the original old-school powder because I had such good luck with it last time.

So how do you use this miracle product? Just wet your dishes and sprinkle some Bar Keepers Friend on, then using a wet sponge or rag, start wiping until it makes a paste and rub all of the surfaces. Rinse off and dry.

Check out the difference:

Easy one step scratch removal for dishes

One step scratch removal for dishes - Tips and Tricks - DIY

How to remove scratches from dishes - Just 1 easy step

diy-homemade-dog-treats-just-2-ingredients-easy-and-healthy

Coconut oil is the star of this recipe! Add in some blueberries, form into cute shapes with a silicone mold, and voila. You’ll have a bag full of one-a-day doggie deliciousness. (Obviously, check with your veterinarian before starting any health regimens or new foods with your own dogs.) Our little chihuahua-mix nibbles ever so delicately at these, while our 60 lb. vizsla chomps them up in one bite.  🙂

WHAT YOU NEED:

  • Frozen blueberries (enough for 1 or 2 in each treat)
  • Coconut Oil, in solid form (I started with 1/2 c. and kept melting a little more at a time as I went, I probably used a little less than 2 c. altogether)
  • Silicone treat mold (I used a 24 bite-size flower mold)

WHAT YOU DO:

Place one or two frozen blueberries into each serving of the silicone mold. Set aside.

In a small saucepan, heat coconut oil over medium heat until it melts.

Pour liquified oil into the mold.

Place entire mold in fridge and let it solidify.

After treats are solid, remove from the mold.

Label a freezer-safe bag or container and store in the freezer.

recipe inspired by hellonatureblog.com

diy-homemade-dog-treats-coconut-oil-and-blueberries-so-easy-and-healthycoconut-oil-and-blueberries-easy-homemade-dog-treats

Here’s a tradition we started a few years ago: Using fabric markers, we write what we are thankful for on a fabric tablecloth. Then the next Thanksgiving, we get out the same tablecloth and do it again. It’s fun each year to look over the previous years’ work, and add on. And it’s washable – we haven’t lost any artwork yet. 🙂

Awesome Thanksgiving tradition - write what you are thankful for each year. Use fabric markers so it stays year after year and add on every time.

Fabric markers - everyone writes what they are thankful for on a fabric tablecloth. Doesn't wash out and you can do this year after year and look back every time you get ready for the next Thanksgiving feast.

DIY greenhouses to protect your plants from rabbits and deer - I just used stuff from our recyle bins - awesome!

Spring is here! My tulips are sprouting, hurrah. Apparently, however, the rabbits think of them as an all you can eat salad bar. They have chewed a bunch of them down to nubs.

To try to keep the wasscaly wabbits from eating any more, I made some DIY mini greenhouses. I grabbed some empty containers from our recyle bin and cut them so the bottoms would be open, and poked some air holes in. I attached them to the ground with push-in gardening staples that I had leftover from a landscaping project.

I ended up reusing a strawberry clamshell container, a little milk bottle from a happy meal, a couple of soda bottles, a gallon milk jug, and an apple juice container. The white milk containers look “unique” in the flower bed (AKA not a lot of curb appeal), so I plan on replacing them with clear containers that blend in a little better and don’t look so obvious.

Sun, and air, and water can go in, and (fingers crossed!) rabbit teeth will stay out. Happy gardening!

DIY mini greenhouses - upcycle milk containers soda bottles and more

gardening tips and tricks - reuse containers and attach with lawn staples - awesome way to recycle AND keep rabbits away

DIY Garden Markers - laminated seed packets so you know what you planted, and where you planted it

DIY Laminated Seed Markers for gardens and containers!

Here’s a craft the kids and I worked on for Valentine’s Day: glass jar candle holders. You can customize these with any colors or patterns of tissue paper to match any holiday or décor. They would make perfect gifts for holidays or teacher appreciation. Many of the supplies can also be found at the dollar store – woo hoo!

DIY Upcycled Jar Candle Holders - just tissue paper and Mod Podge - customize for any theme, colors, or decor.

WHAT YOU NEED:

WHAT YOU DO:

Tear pieces of tissue paper to use as your first layer, and stick to the outside of the jar using Mod Podge.

Add a second layer with shapes (trace shapes onto tissue paper using cookie cutters then cut out – or freehand cut out your shapes).

After your candle holder has its final design, coat all tissue paper with a layer of Mod Podge and let dry.

Place a flameless tea light inside the jar, and enjoy!

DIY Jar Candle Holders - tissue paper and ModPodge - easy kids craft!

DIY Jar Candle Holders - tissue paper and ModPodge - easy kids craft - use different colors and patterns of tissue paper for your theme.


DIY Jar Candle Holders - tissue paper and ModPodge -  use different colors and patterns of tissue paper for your theme.


Turn plain old jars into candle holders with just tissue paper and Mod Podge - DIY Tutorial

Turn old jars into candle holders with just tissue paper and Mod Podge - DIY Tutorial

flameless tea lights

Our little guy used the tissue paper shapes to make his own Valentine’s Day artwork by gluing hearts on paper…

Tissue Paper Valentines Day Craft - Toddler Art


Set up a station before Christmas or Birthday Parties - tools, box cutter, batteries, etc so you're not running all over the place once the kids start unwrapping

Every year on Christmas morning, from a giant pile of wrapping paper and tissue paper, we hear “Mom can you open this?” and “this needs batteries,” and “here’s some trash.” This year we’ll be ready. I set up a little station by the tree with trash bags, a box for recycle, tools like box openers, screwdrivers, and pliers, and mass quantities of batteries (separated into gallon ziplock bags by size). This would also work for birthday parties, or showers — add a pen and paper to record gifts for thank you notes later. Happy Holidays!

Here’s an easy tip to de-clutter holiday cards and photos: you need only a paper hole punch and book rings! 

If you’re like me, by the time Christmas arrives your fridge is covered in cards, photos, and holiday letters. Last year I started punching a hole in the corner of them, putting them on a book ring, and hanging the ring on the fridge. When I put away our holiday decorations, I stored the cards, and this year when I decorated for Christmas it was fun to flip through them again. So, an annual tradition has started, I suppose.

I plan on keeping each year on a smaller ring, and looping all the smaller rings on to one big ring. Everything will be together, but separated by year. OCD much?!? 🙂

WHAT YOU NEED:

WHAT YOU DO:

Punch a hole in the corner of each card/photo/letter, and loop on to a book ring. Hang, then add to it as the cards roll in.

use looseleaf book rings to store cards and photos DIY greeting card organization with a hole punch and looseleaf binder book rings

gift tag - book rings and holiday cards


Of course, you could also use this method to store birthday cards, trip mementos, wedding cards, photographs, gift cards, or coupons.

Here’s an all-natural way to clean drains: shower drains, kitchen sinks, bathroom sinks, and more. I tried this on our kitchen sink (after a disgusting “mystery” smell took over, which was coming from the drain – gross!) and it worked great. The kids loved watching so they could hear the “fizz” in the drain after the vinegar mixed with the baking soda.

DIY all natural drain cleaner - bathrooms - showers - kitchen sinks - just 2 ingredients you probably already have

WHAT YOU NEED:

  • equal parts baking soda and white vinegar (I used 1 cup each)
  • boiling water (a few cups worth or so, to rinse afterward)

WHAT YOU DO:

  • Sprinkle baking soda down drain.
  • Pour vinegar on top.
  • Let sit for 10 minutes.
  • Rinse by pouring boiling water down the drain (turn garbage disposal on to clean blades, if one is in the drain).


Here are some more ideas for easy DIY cleaning solutions:

baking soda deodorizing disks

3-ingredient granite cleaner

microwave cleaner

dishwasher rinse-aid

baking soda & vinegar carpet spot cleaner

baking soda and essential oil carpet sprinkling powder

Assemble the Minions!!! Here are a couple of DIY ideas for birthday parties: personalized water bottle labels, and healthy Minion bananas.

DIY minion bananas and personalized water bottle labels

DIY personalized water bottles


Our daughter celebrated the big #4 with a gymnastics party, and a Despicable Me theme: minions and unicorns. I made some personalized water bottle labels, with just printer paper and packaging tape. And banana minions with printed overalls and goggles. Here’s what I did….

In Microsoft Word I made some rectangles sized to the water bottle labels, and added some images to go with our theme. I printed them out, and attached them to the water bottles with packaging tape.

DIY personalized water bottles

DIY personalized water bottle labels - perfect for parties, picnics, or birthdays - just printer and packaging tape


DIY personalized water bottle labels - customize with your theme - birthday parties - picnics - graduation

DIY personalized water bottle labels - perfect for birthdays, graduation, parties, etc

I printed some Minion overalls and goggles, then taped them on to bananas. We ended up with a lot of leftover bananas after the party, so I made some chocolate chip banana bread AND dried some banana slices in our dehydrator.

DIY minion bananas and personalized water bottle labels