Here’s a delicious twist on traditional buffalo wings: marinade wings in a mixture of soy sauce, brown sugar, garlic and fresh ginger, then roast in the oven, and finally saute in sriracha, lime juice, and butter.  YUM.

Asian Glazed Wings - simple ingredients and so delicious I am making these again for the second time this week

I adapted this recipe from the 2017 magazine “350-Calorie Meals in Minutes” but added toasted sesame seeds.

WHAT YOU NEED:

  • 2 lbs. uncooked chicken wings
  • 1/2 c. low sodium soy sauce
  • 1/4 c. brown sugar (divided in half)
  • 4 cloves minced garlic
  • 1 Tbsp. grated fresh ginger
  • 2 Tbsp. butter
  • 1 Tbsp. sriracha
  • juice of 1/2 a lime
  • 1 Tbs. sesame seeds
  • optional: chopped scallions or green onions

WHAT YOU DO:

  1. PREPARE THE MARINADE – combine soy sauce, 1/8 c. brown sugar, garlic, and ginger in a gallon ziplock bag. Add wings, mix to coat, and seal. Marinate in refrigerator for at least an hour.
  2. TOAST THE SESAME SEEDS – Place seeds in a dry skillet and heat over medium heat for 3-5 minutes or until lightly browned, stirring occasionally (watch closely to avoid burning). Set aside.
  3. TO PREPARE MARINATED WINGS – Preheat oven to 450ºF. Remove wings from the bag and place in a single layer on a baking sheet lined with foil sprayed with non-stick cooking spray. Roast wings in the oven for approximately 15 minutes, until the meat is cooked through and the skin begins to crisp and caramelize.
  4. SAUTE THE WINGS –  In a large skillet, heat butter, sriracha, lime juice, and 1/8 c. brown sugar until melted. Add wings and saute for 3-4 minutes, or until the sauce clings to the chicken.
  5. GARNISH – with toasted sesame seeds and (optional) scallions/green onions

hutch restained

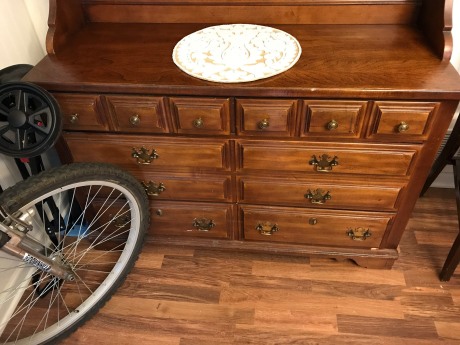
So I bought a two-piece hutch on Craigslist for $50 including the seller delivering it to our house. I knew it needed some work on the drawers (the seller had tried to repair lots of the inside parts). I also soon realized that it came from a smoker’s den (ha!) when cigarette butts literally fell out of it.

I took all the drawers out and aired everything outside for a few days. I also wiped it down many times with vinegar. When I brought it inside I placed big bowls of baking soda in the drawers and cabinets to try to suck up some of the smoke smell.

hutch door

hutch before

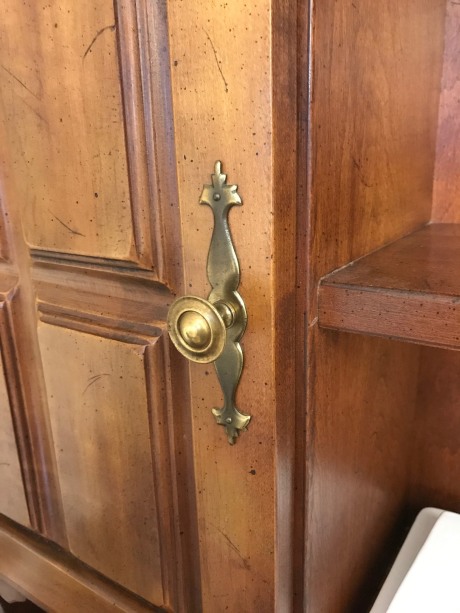
My dad fixed all of the drawers (thanks, Dad!!!) and we had a functional, albeit dated-looking dining room hutch. Think 1980s antique brass handles and knobs and a light finish with dark speckles. And an occasional smokey scent when it got humid or warm…

Fast forward to a couple years later; I bought some wooden dining room chairs and 20 yes TWENTY soup bowls yikes from a closed restaurant auction (here’s my post on spiffing up the soup bowls). The chairs are a darker wood, and it was like those “If You Give a Mouse a Cookie” books – now that I had dark chairs I wanted a darker hutch. And a darker hutch needed updated knobs and drawer pulls. And a nice hutch and chairs called for a matching plant stand/table and then I wanted a new tablecloth, etc, etc, etc.

Anyway, here’s what I did to update the hutch. I took out the drawers and removed the doors and hardware. I wanted to get the top layer off and not go all the way to the wood, so I sanded all the surfaces with 220-grit sandpaper (I used a 1/4-sheet electric sander for the large surfaces, and sanded the smaller details by hand). I wiped everything with a damp rag to get all of the dust.

hutch sanding

I applied one coat of Minwax PolyShades Bombay Mahogany (Satin) and let it dry overnight. Then I lightly buffed over the stain with Extra Fine #000 Steel Wool and wiped it down before adding a second coat of PolyShades.

After the second coat dried my favorite step was next: adding new knobs and drawer pulls. I decided on satin nickel, and used Liberty 2-1/2″ drawer pulls and Liberty 1-1/4″ round knobs. I put satin nickel backplates behind the knobs on the two doors.

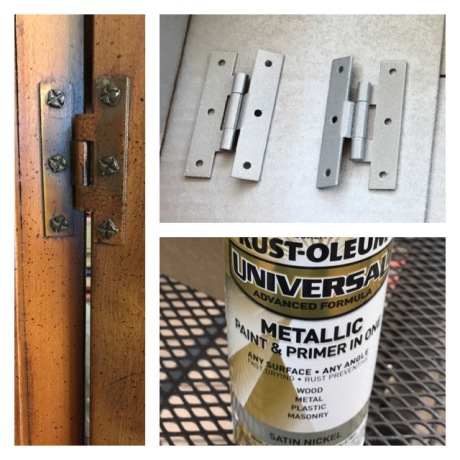
I scoured the internet and local home improvement stores for replacement hinges, but they are some weird style that’s impossible to find. I didn’t want to fill in holes and drill new ones, so I ended up spray painting the original hinges and screws with Rust-Oleum Satin Nickel Metallic Spray Paint.

hutch hinge

The smoke smell is definitely gone for now (hurray for varnish fumes, ha!) and I am very happy with how all the different pieces our little Frankenstein hutch came together. Who’s ready to eat some soup?!?

hutch restained


Here’s an easy way to remove scratches from dishes and make them shine like new.

Life Hacks - how to remove those little black scratches from your dishes - So easy and they look brand new

One of my favorite West Omaha restaurants closed recently (*sniffle*) and they auctioned off everything that was inside. I ended up with a lot (get it, a “lot”?!?) of wide rimmed soup bowls. Twenty of them, eek! I paid just $0.75 each and figure we can have all of our friends over for a soup party, soooo wild and crazy, right?!? Ha.

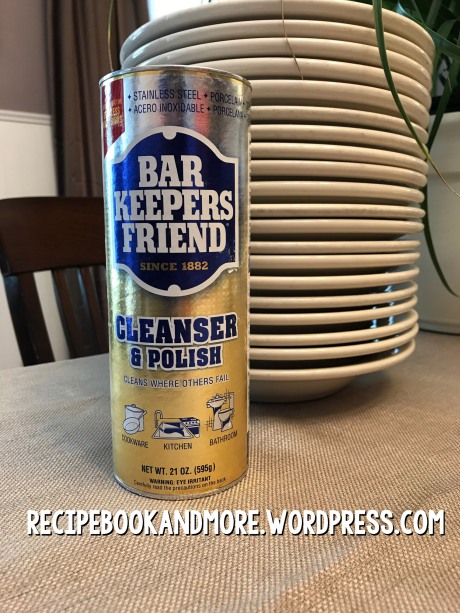
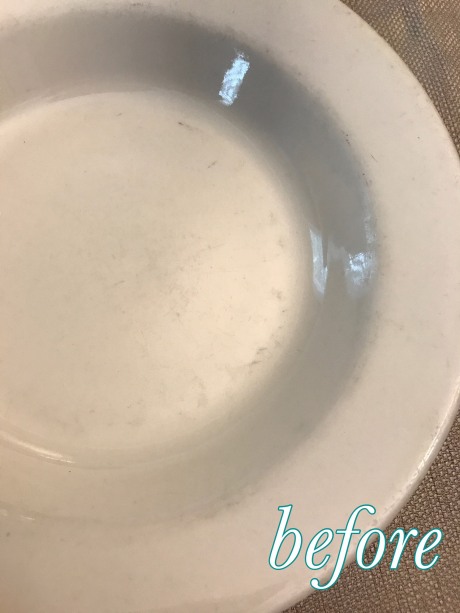
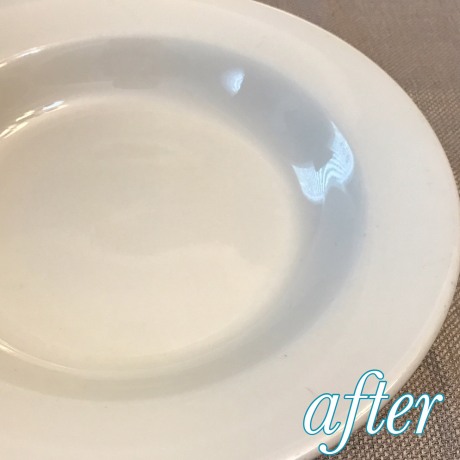
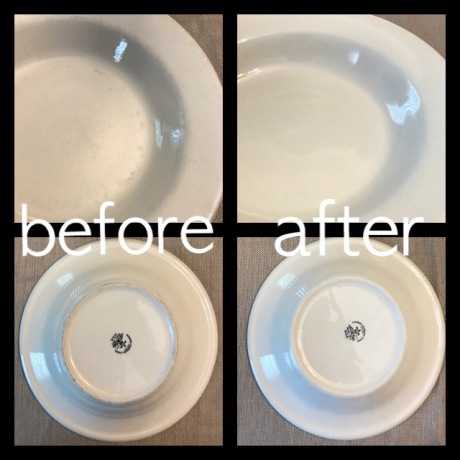
Anyway, these were obviously used for tons of restaurant customers, and were pretty scratched up (and literally black on the underside rim). Enter my secret weapon: BAR KEEPERS FRIEND.

I first tried this magical powder when we snaked out a toilet (um, gross!) and the metal snake left scratches in the porcelain bowl. I sprinkled some Bar Keepers Friend on the water, let it sit for a few hours, and when I scrubbed the bowl then flushed, the scratches were gone. It was awesome.

I bought a new container at Target for $1.99, but you can find Bar Keepers Friend almost anywhere that sells cleaning supplies. Bar Keepers Friend also comes in a liquid form, and a spray bottle with foam, but I stuck to the original old-school powder because I had such good luck with it last time.

So how do you use this miracle product? Just wet your dishes and sprinkle some Bar Keepers Friend on, then using a wet sponge or rag, start wiping until it makes a paste and rub all of the surfaces. Rinse off and dry.

Check out the difference:

Easy one step scratch removal for dishes

One step scratch removal for dishes - Tips and Tricks - DIY

How to remove scratches from dishes - Just 1 easy step

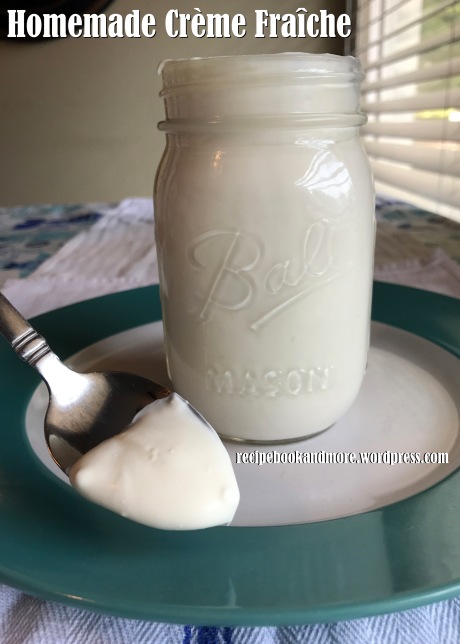
Here’s an unbelievably easy recipe I learned in a cooking class – add two ingredients to a jar and let it sit overnight. That’s it! You’ll end up with creme fraiche, which is similar to sour cream, but not as sour, and not as thick. It has a higher fat content than sour cream, but… everything in moderation, right?!? You can add a spoonful to scrambled eggs right before serving for some creamy goodness, or use to drizzle over prepared dishes. You can mix in some fresh herbs and a squeeze of fresh lemon juice, then drop some on chicken or fish. Our oldest likes to put it on his tacos instead of sour cream. Fanciest taco ever, ha! 🙂

Homemade Crème Fraîche Recipe

Creme Fraiche

WHAT YOU NEED:

  • 2 tablespoons cultured buttermilk
  • 1 pint heavy cream

WHAT YOU DO:

Combine cream and buttermilk in a non-reactive container (I used a glass pint jar). Mix gently, and allow to rest uncovered at room temperature until thickened to desired texture, usually overnight, or up to 12 hours or so. Cover and store in the refrigerator for up to 2 weeks.

According to J. Kenji Lopez-Alt from SeriousEats.com:
“Add more buttermilk and you’ll need less time for it to thicken (but it’ll be less creamy). Add more, and it takes longer, but tastes better… It gets super rich and creamy at right about the 12-hour mark. You can also halt the process early by just refrigerating it to stop the bacterial action. This is useful if you want a thinner Mexican-style crema agria for drizzling over tacos or sopes. For those of you worried about cream spoiling at room temp, that’s the idea: it’s the good bacteria from the buttermilk multiplying in there that prevents the dangerous bacteria from taking over.”

Hollandaise Over Roasted Potatoes Recipe – great way to use fresh and simple ingredients: eggs, butter, lemon juice, and potatoes.

Check out these fresh chicken eggs we bought from Barreras Family Farm. They are so pretty!

free range chicken eggs

I used them with some fresh lemon juice and melted butter to make my favorite sauce: Hollandaise. Then I topped some roasted potatoes and enjoyed an excellent dish while I sat outside eating ALL ALONE. Major accomplishment around here. 🙂

So…. here’s what I did. Start the potatoes first and while they are in the oven, make the hollandaise.

Hollandaise Sauce over Roasted Potatoes Recipe

ROASTED POTATOES RECIPE

WHAT YOU NEED:

  • 10-12 small potatoes, cut into chunks
  • 2 Tbs. olive oil
  • 1-2 Tbs. chopped fresh parsley
  • 1 clove minced garlic
  • salt and pepper, to taste

WHAT YOU DO:

Preheat oven to 450ºF. Cover a baking sheet with foil and spray with non-stick cooking spray (or mist with olive oil).

Gently toss all ingredients in a mixing bowl. Spread evenly on baking sheet,.

Bake for 40 minutes or so, until potatoes start to get golden brown on the outside, and remove from oven.

HOLLANDAISE SAUCE:

While potatoes are roasting, make the sauce. 

WHAT YOU NEED:

  • 4 egg yolks
  • 1-2 Tbs. fresh squeezed lemon juice
  • 1/2 c. melted butter
  • cayenne pepper, to taste
  • salt, to taste

WHAT YOU DO:

In a stainless steel mixing bowl whisk egg yolks and lemon juice until thick and doubled in volume. Here’s a tip for keeping the bowl from sliding around while you whisk.

Place bowl on a pot of barely simmering water (or double boiler) and whisk. Don’t let the water actually touch the bowl, and avoid getting the water too hot because the yolks will scramble.

As you continually whisk, slowly drizzle in the melted butter, just a few drops at a time. If you add the butter too fast it will coalesce the fat, which will make the sauce separate. Trust me, been there done that. 😉

Continue whisking until desired thickness is reached. Add a pinch of salt and a pinch of cayenne, to taste. If needed, add more lemon juice. Hold warm until ready to serve. If sauce gets too thick you can add hot water a few drops at a time and whisk.

Here’s some great information on making hollandaise, with lots of science-y information behind a good hollandaise and what to do if your sauce breaks or curdles:

https://stellaculinary.com/content/how-make-hollandaise-french-mother-sauce


You might also enjoy: Whole Roasted Chicken in a Slow Cooker Recipe

Awesome slow cooker recipe - Whole Roasted Chicken - just rub some spices on, throw in some onions, and set your Crock Pot


Super Easy Cilantro-Lime Rice Recipe: Copycat Chipotle – Make a huge batch and freeze the extras in individual portions. 

Cilantro Lime Rice Recipe - make a bunch and freeze the extras

A few years ago I posted a recipe for Cilantro-Lime Rice, which you can make on the stove. I love making HUGE batches of this and freezing individual portions. Just reheat in the microwave and you have a perfect side dish, main dish, in a rice bowl with chicken or steak, in burritos, or as a nacho topping.

I am also totally in love with my rice cooker, so recently I’ve been doing it the super-easy way. Just prepare the rice in the steamer using jasmine rice and chicken broth (instead of water, for more flavor). After it’s cooked, stir in fresh squeezed lime juice, freshly grated lime zest, and chopped cilantro leaves. Fresh and easy.

My rice cooker holds 3 cups dry rice (which ends up being around 6 cups after cooking), so you can adjust this recipe accordingly.

If you prefer the stovetop method instead of a rice cooker, here’s my original recipe for Cilantro-Lime Rice.

WHAT YOU NEED:

  • Jasmine rice (I used 3 cups per batch)
  • Chicken or Vegetable broth (I used 2 cups per batch)
  • Limes (I used 2-3 per batch)
  • Fresh cilantro (I used the leaves from half of one bunch per batch)
  • Optional: Sea Salt, to taste

WHAT YOU DO:

Measure dry rice and rinse under water (to keep the rice from getting too sticky), then drain.

Add rinsed rice to cooker and add chicken broth to the line indicated on your cooker.

Cook according to manufacturer instructions (on mine, this means just put a lid on it and press the ON button). While rice is cooking, rough-chop the cilantro leaves.

After rice has finished, pour cooked rice into a large mixing bowl. Stir in cilantro, the juice and zest from the limes.

Optional: add salt, to taste.

TO FREEZE: Cool finished rice then place in freezer-safe, microwavable containers, in whatever portions you will need, and mark the date with a Sharpie (keeps up to 3 months). To reheat, remove lid, sprinkle the frozen rice with 1-2 Tbs. water, cover with a damp paper towel and microwave for 1-3 minutes depending on the portion size. Fluff gently then repeat. Let stand for a couple of minutes before fluffing once more and serving. Or, to save freezer space, use ziplocks (instead of containers), flatten the ziplocks down, and put in a microwave-safe dish before reheating.

Cilantro Lime Rice Recipe - freezer friendly and so easy just use a rice cooker and it is perfect

Here’s an easy recipe for light puffy breadsticks: just throw some cheese and herbs on a sheet of puff pastry and bake! You can customize these with your favorite pizza/breadstick toppings.

Puff Pastry and Cheese for an awesome batch of breadsticks

WHAT YOU NEED:

  • 1 sheet puff pastry
  • 1/4 c. grated Parmesan cheese
  • to taste: garlic powder, parsley flakes, and/or oregano
  • crushed red pepper flakes

WHAT YOU DO:

Preheat oven to 375°F. Line a baking sheet with parchment paper.

Lay the puff pastry flat on the parchment paper and sprinkle on the cheese. Add garlic powder, parsley flakes and/or oregano to taste.

Using a knife or pizza cutter, cut puff pastry in half (going the short direction). Then cut the long way into 1-inch strips.

Bake for 7-10 minutes or until golden brown.

Before serving, top with crushed red pepper flakes.

Just add cheese and herbs to puff pastry and cut into breadsticks - So easy and delicious


recipe adapted from 4 Ingredients by Kim McCosker & Rachael Bermingham

One-Dish Rotisserie Chicken and Orzo Bake

One thing I buy every time I go to Costco is a rotisserie chicken (or two. or three. whatever). The kids love it straight off of the bone but it’s also great for recipes that call for cooked chicken. Of course, if you want to be a total overachiever (ha!) you can make a whole chicken in the slow cooker, and use that in place of the rotisserie chicken.

Anyway, on to the main attraction:

One Dish Chicken and Orzo Bake Recipe

ONE-DISH ROTISSERIE CHICKEN AND ORZO BAKE

WHAT YOU NEED:

  • 2 tsp. olive oil
  • 1 c. uncooked orzo
  • 1 tsp. minced garlic
  • 1 tsp. onion powder
  • 2 c. chicken stock
  • 2 c. rotisserie chicken, shredded
  • salt & pepper, to taste
  • optional: 1 sliced zucchini and/or 1 c. halved cherry tomatoes
  • optional toppings: grated parmesan cheese, red pepper flakes, parsley flakes

WHAT YOU DO:

Step 1 – Preheat oven to 450° F.

Step 2 – Place all ingredients, including salt and pepper, in a 9×13-inch baking dish (optional: add zucchini and/or cherry tomatoes during this step). Mix well.

Step 3 – Bake for 25 minutes, stirring two or three times while baking. Serve warm and add optional toppings.

recipe adapted from 30-Minute One-Pot Meals by Jo Cismaru

diy-homemade-dog-treats-just-2-ingredients-easy-and-healthy

Coconut oil is the star of this recipe! Add in some blueberries, form into cute shapes with a silicone mold, and voila. You’ll have a bag full of one-a-day doggie deliciousness. (Obviously, check with your veterinarian before starting any health regimens or new foods with your own dogs.) Our little chihuahua-mix nibbles ever so delicately at these, while our 60 lb. vizsla chomps them up in one bite.  🙂

WHAT YOU NEED:

  • Frozen blueberries (enough for 1 or 2 in each treat)
  • Coconut Oil, in solid form (I started with 1/2 c. and kept melting a little more at a time as I went, I probably used a little less than 2 c. altogether)
  • Silicone treat mold (I used a 24 bite-size flower mold)

WHAT YOU DO:

Place one or two frozen blueberries into each serving of the silicone mold. Set aside.

In a small saucepan, heat coconut oil over medium heat until it melts.

Pour liquified oil into the mold.

Place entire mold in fridge and let it solidify.

After treats are solid, remove from the mold.

Label a freezer-safe bag or container and store in the freezer.

recipe inspired by hellonatureblog.com

diy-homemade-dog-treats-coconut-oil-and-blueberries-so-easy-and-healthycoconut-oil-and-blueberries-easy-homemade-dog-treats

Here’s an easy and delicious healthy meal idea: Artichoke and Lemon Chicken. I used ghee to make this recipe Whole 30 compliant, but you can use butter, coconut oil, olive oil, etc. or whatever you prefer. Just start it on the stovetop in a cast-iron skillet and move the whole thing to the oven to finish.

artichoke-and-lemon-chicken-recipe-whole-30-cast-iron-skillet-one-pot-meal

WHAT YOU NEED:

  • 4 Tbs. cooking fat (butter, coconut oil, ghee, etc), divided into two Tbs. each
  • Half of one onion, sliced
  • 2 cups canned artichoke hearts, drained and quartered
  • 1/2 tsp. dill
  • juice of 2 lemons
  • 2 lbs. uncooked chicken breasts
  • sea salt and black pepper, to taste

WHAT YOU DO:

Preheat oven to 375°F.

In a cast-iron skillet over medium heat, melt 2 Tbs. of the cooking fat. Add onions and sauté until translucent. Add artichoke hearts, dill, and lemon juice. Stir gently to combine.

Place the chicken on top of the ingredients in the skillet, then top each piece of chicken with a small pat of the remaining 2 Tbs. of cooking fat.

Put the entire skillet into the oven and bake for 45 minutes (or until chicken reaches an internal temperature of 165°F).

recipe adapted from Practical Paleo by Diane Sanfilippo